I didn’t plan on making this.
It started on one of those weeknights where everything felt a little rushed. I had something on the stove, my hands were messy, and I was digging through a kitchen drawer trying to find a recipe card I knew I had saved.
You can probably guess how that went.
That drawer had turned into a mix of coupons, old notes, and random paper scraps. Not exactly helpful when you’re trying to cook quickly.
That was the moment I realized I didn’t need anything fancy, just something simple that would keep my recipes where I could actually see them.
So I made this DIY recipe card holder, and honestly, it’s one of the most useful small projects I’ve done in a while.
Key Takeaways
- You probably already have most of the materials at home
- It takes less than two hours from start to finish
- Keeps recipes visible while you cook (no more digging through drawers)
- Easy to customize to match your kitchen
- Works for recipes, grocery lists, or even kids’ notes
- Makes a simple but thoughtful handmade gift
What You’ll Need
You don’t need anything complicated here, which is part of why I love this project.
- 4 to 6 flat wooden clothespins
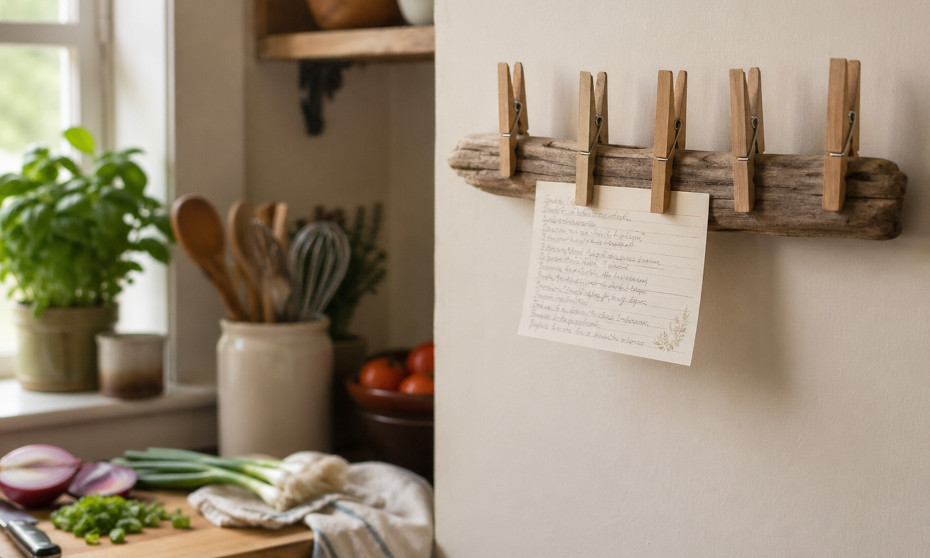
- A piece of driftwood, wooden dowel, or even a sturdy twig (about 10–12 inches long)
- Strong craft glue or a low-temp glue gun
- Twine or jute rope
- Acrylic paint and a small brush (optional)
- Fine sandpaper (optional)
- Washi tape or stamps (optional)
I used a mix of things I already had sitting around, including a piece of driftwood I had saved for no real reason. Turns out, it came in handy.
Step-by-Step Instructions
Step 1: Prep Your Base
Start with your wood piece. If it feels rough or uneven, give it a quick sanding so everything sits flat.
I went with driftwood because I like the slightly imperfect, natural look. But if you want something cleaner, a wooden dowel works just as well.
If you’re planning to paint it, do that now before attaching anything. It’s much easier this way, trust me.
Step 2: Paint the Clothespins (or Don’t)
This is the part where you can get creative—or keep it simple.
You can:
- Leave them natural
- Paint them in soft neutrals
- Add stripes or tiny patterns
- Let your kids decorate them (just expect a little mess)
I kept mine in warm, muted tones so they blend in with the rest of my kitchen.
Just make sure everything is completely dry before moving on. I rushed this the first time and ended up with smudges everywhere.
If you enjoy adding small decorative touches like this, you might also like these DIY refrigerator magnet crafts using kitchen themes, which are just as simple and fun to make.
Step 3: Attach the Clothespins
Lay everything out first to figure out spacing.
I found that three clips work well for standard recipe cards, but you can add more if you want.
Apply glue to each clothespin and press it firmly onto the wood. Hold it in place for about 30 seconds so it actually sticks.
If you’re using a glue gun, work a little faster since it sets quickly.
Then leave it alone for at least an hour. I know it’s tempting to move on, but this is where patience pays off.
Step 4: Add the Hanging Twine
Cut about 18 inches of twine and tie it securely to both ends of your wood.
Leave a bit of slack so it hangs naturally. I added a tiny drop of glue to the knots just to keep everything in place.
Step 5: Hang It Where You’ll Actually Use It
This part matters more than you think.
Don’t hang it somewhere just because it looks nice. Put it where you actually cook.
Good spots:
- Near the stove
- Above your prep area
- On a nearby wall within arm’s reach
I placed mine right next to where I usually chop and prep, and it made a bigger difference than I expected.
If you’re trying to create a space that feels both functional and put together, you might also like my guide on How to Style Your Kitchen Counter, where I share simple ways to keep your counter looking clean without losing practicality.

A Freestanding Option (If You Don’t Want to Hang It)
If wall space is tight, you can make a version that stands on your counter.
Just attach your wood piece to a small wooden block so it stays upright.
I tried this first, and it worked well, especially when I was testing where I wanted it permanently.
What I Learned (The Hard Way)
The first time I made this, I used spring-loaded clothespins.
Big mistake.
They kept snapping shut while I was trying to glue them, and they didn’t sit flat. I ended up redoing the whole thing.
Flat clothespins are so much easier to work with.
I also learned not to rush the drying time. In a busy kitchen, it’s tempting to speed things up, but that’s usually how things fall apart later.
Now I always keep a few blank recipe cards clipped onto the holder. It makes it easy to jot down quick meal ideas during the week without searching for paper.
Common Mistakes to Avoid
- Using too little glue (they will fall off)
- Skipping sanding on uneven wood
- Painting after everything is already assembled
- Using thin or weak twine
These are small things, but they really affect how long your holder lasts.
Why This Actually Works (Especially in Busy Homes)
When your kitchen is constantly in use, even small changes can make things easier.
This isn’t just a decorative project. It’s one of those little systems that removes friction from your day.
Instead of stopping what you’re doing to search for a recipe, it’s already right in front of you.
And sometimes, that’s all you need to make cooking feel a little less hectic.
Frequently Asked Questions
Can I use regular clothespins?
You can, but flat ones are much easier to glue and stay in place better.
What if I don’t have driftwood?
A wooden dowel or even a thick craft stick works just fine.
How do I keep it clean in the kitchen?
You can seal painted areas with a clear coat to protect against moisture.
Can kids help with this?
Yes, especially with painting. Just be ready for a bit of cleanup after.
How many recipes can it hold?
Usually around three, but you can always add more clips if needed.
Final Thoughts
This is one of those small projects that quietly make everyday life easier.
It keeps recipes where I can actually see them, cuts down on clutter, and adds something personal to my kitchen without taking much time or effort.
And honestly, anything that makes cooking feel a little smoother on a busy day is worth it.
If you’ve been meaning to organize your recipes but didn’t want anything complicated, this is a really good place to start.