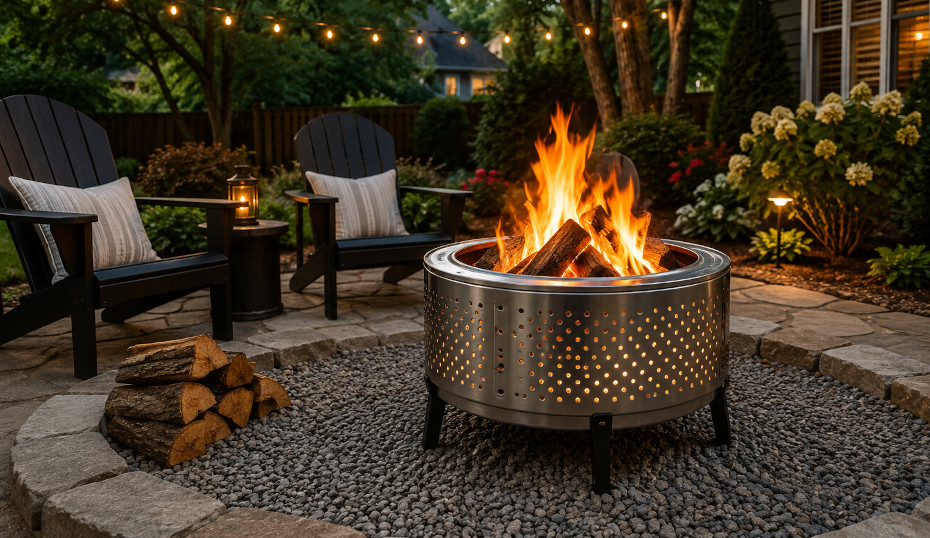
There’s something satisfying about giving an old appliance a second life instead of sending it to the scrapyard. That’s exactly what happened when our washing machine finally gave out after years of service. Before hauling it away, I noticed the stainless steel drum and realized it already had one of the most important features of a good fire pit: hundreds of evenly spaced ventilation holes.
Instead of buying a new fire pit, I decided to build one myself. The repurposed washing machine drum project took an afternoon, cost very little, and has since become one of the most-used features in our backyard. If you have access to a worn-out washer that truly isn’t worth repairing, a washing machine drum can become a sturdy, attractive fire pit with just a few tools and some careful preparation.
Key Takeaways
- Stainless steel drums from top-load washing machines are the best option because they resist rust and provide excellent airflow.
- Most of the work involves cleaning and preparing the drum rather than assembling it.
- A stable metal stand or masonry base makes the fire pit safer and extends its lifespan.
- Always confirm the washer isn’t worth repairing before taking it apart.
- Check local fire regulations and HOA rules before using your fire pit.
What You’ll Need
Many of the materials can be salvaged or purchased secondhand.
Gather the following:
- Stainless steel washing machine drum
- Angle grinder with cutting and grinding discs
- Wire brush or steel wool
- Heavy-duty work gloves
- Safety glasses
- Three steel legs, angle iron, or a fire pit stand
- Welder or stainless steel bolts and lock nuts
- High-temperature paint (optional for cosmetic touch-ups)
If you’re looking for a drum, check appliance repair shops, recycling centers, or local scrap yards. Many damaged washers are already waiting to be recycled, and the drum can often be purchased for very little.
Step 1: Make Sure the Washer Is Beyond Repair
Before taking a washer apart, make sure it’s truly reached the end of its life. Many common problems, such as a worn belt, faulty drain pump, or broken lid switch, can often be repaired for much less than the cost of a new appliance.
Our washer was making a loud grinding noise during the spin cycle, so I had it inspected before pulling out the tools. The technician confirmed that the bearings had failed and that repairing an older machine wouldn’t be cost-effective. That gave me peace of mind knowing I wasn’t dismantling an appliance that still had years of service left. If you’re unsure about your own washer, consider scheduling an inspection with the best Roswell appliance repair service before deciding to repurpose it.
Once you’ve confirmed the washer isn’t worth repairing, disconnect the power and water supply. Remove the outer cabinet, motor, wiring, rubber seals, and plastic components until only the stainless steel drum remains. Some bolts may be rusted or difficult to remove, so work patiently and wear heavy gloves to protect yourself from sharp metal edges.
By the end of this step, you should have a clean, bare drum that’s ready for inspection and preparation.
Step 2: Clean and Inspect Everything
Cleaning isn’t the most exciting part of the project, but it’s the step that determines how good the finished fire pit will look.
Scrub away detergent residue, grease, rust stains, and mineral buildup with a wire brush or steel wool. Once the drum is clean, inspect every opening where parts were removed.
The first drum I worked on had a razor-sharp edge hidden beneath one mounting bracket. I didn’t notice it until it snagged my leather work glove while adding firewood during the first test burn. Fortunately, the glove took the damage instead of my hand. Since then, I grind every exposed edge smooth before calling the project finished.
Run your hand carefully around the rim while wearing gloves. If anything catches, smooth it with an angle grinder.
A few extra minutes here can prevent injuries later and give the fire pit a much more polished appearance.
Step 3: Build a Stable Base
Although some people simply place the drum on bricks, I prefer attaching permanent legs. The fire pit feels sturdier, sits at a more comfortable height, and is less likely to shift when someone adds another log.
Three legs are usually enough because they naturally stay level on uneven ground. You can weld pieces of angle iron or steel tubing to the drum, or bolt them securely using stainless steel hardware.
If you don’t have welding equipment, a heavy-duty metal fire pit stand works just as well. Just make sure it’s designed to support both the drum’s weight and a full load of burning hardwood.
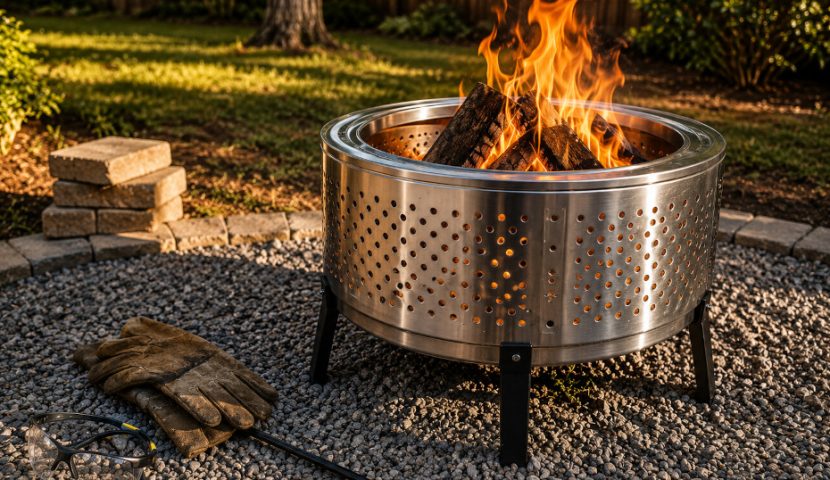
Once assembled, place the finished fire pit on a noncombustible surface such as gravel, pavers, concrete, or compacted stone. Avoid setting it directly on grass or wooden decking, where heat can cause damage over time.
The extra effort to build a solid foundation pays off every time you use the fire pit. It not only improves safety but also makes the finished project look like a permanent backyard feature rather than a recycled appliance.
Step 4: Season the Fire Pit
Before using your new fire pit for an evening gathering, perform a small test burn.
Burn a few pieces of dry, seasoned hardwood for 20 to 30 minutes. This first fire burns away any remaining residue, reveals weak spots in the stand, and allows the metal to expand and contract gradually.
Watch for any wobbling or shifting as the fire burns. If the base moves, tighten the hardware or reinforce the legs before regular use.
Once everything cools, brush away any ash and check the drum for discoloration or loose fasteners. A quick inspection now can prevent problems later.
Step 5: Add the Finishing Touches
The drum works perfectly well on its own, but a few finishing touches can make it look as if it were designed for your patio.
I surrounded mine with gravel and a simple ring of pavers, which improved drainage and gave the area a cleaner appearance. Some homeowners prefer natural stone, while others build a circular seating area around the pit to create a more inviting gathering space. You can also personalize the space with handmade décor, such as outdoor lanterns, planters, or a DIY painted herb garden sign that adds character to your patio or garden.
If you plan to leave the fire pit outdoors year-round, consider buying a weather-resistant cover. Although stainless steel resists rust far better than painted steel, keeping rain and debris out of the drum will help it stay in good condition for years.
Tips for Building a Fire Pit in Roswell
Roswell’s warm, humid climate is one reason I recommend using a stainless steel drum rather than a galvanized steel one. Stainless steel handles repeated heating and cooling better and requires less maintenance over time.
Before lighting your first fire, check local regulations and any HOA guidelines that apply to your neighborhood. Burn restrictions may be issued during particularly dry weather, and some communities have rules about open flames or setback distances from structures.
Think about where you’ll place the fire pit, too. Keep it well away from fences, tree branches, outdoor furniture, and anything else that could catch fire. A level surface with plenty of open space makes the fire pit both safer and more enjoyable to use.
Lessons Learned From the Project
Building the fire pit itself wasn’t difficult. Most of the effort went into preparation.
Cleaning every surface, removing sharp edges, and building a solid base took far longer than I expected, but those extra steps made a noticeable difference in the finished product.
Another lesson was knowing when an appliance has reached the end of its life. Before taking our washer apart, I asked a technician from Appliance EMT to inspect it. The bearings had failed, and the cost of replacing them wasn’t worth it for an older machine. Getting a professional opinion gave me confidence that repurposing the drum was the right choice, rather than scrapping an appliance that still had useful years left.
If you’re unsure about your own washer, it’s worth scheduling an inspection before dismantling it. A qualified technician can help you decide whether repairing the appliance or repurposing the drum is the better investment.
Frequently Asked Questions
What type of washing machine drum works best?
A stainless steel drum from a top-load washing machine is the best choice. Its perforated design provides excellent airflow, and stainless steel stands up well to years of outdoor use.
Can I burn wood safely in a washing machine drum?
Yes, as long as every plastic, rubber, and electrical component has been removed. Complete a small seasoning burn before regular use to eliminate any remaining residue.
Do I need a permit for a backyard fire pit in Roswell?
Many residential fire pits don’t require a permit, but you should always check current City of Roswell regulations, Fulton County burn restrictions, and any applicable HOA rules before lighting a fire.
How long will a washing machine drum fire pit last?
A stainless steel drum can last for many years with basic maintenance. Remove ash regularly, keep the fire pit clean, and cover it when it’s not in use to help extend its lifespan.
Is this a beginner-friendly DIY project?
Yes. Most homeowners with basic tools can complete the project in an afternoon. The biggest challenges are safely removing the drum, smoothing sharp edges, and building a sturdy base.
Final Thoughts
A washing machine drum might not look like much when it’s sitting inside a broken appliance, but it’s almost perfectly designed for a backyard fire pit. The built-in ventilation holes create excellent airflow, the stainless steel handles high temperatures well, and the project costs far less than buying a comparable fire pit.
The key is not to rush the process. Confirm the washer isn’t worth repairing, prepare the drum carefully, and build a stable base before lighting your first fire. Those extra steps take a little more time, but they result in a safer, better-looking fire pit that you can enjoy for years.
With a little effort and a bit of creativity, you can turn an appliance headed for the recycling center into the centerpiece of your next backyard gathering.
About the Author