I didn’t realize how unfinished my herb garden looked until I stepped back one afternoon and really looked at it.
The herbs were growing well, but everything felt random. Mismatched pots, fading plastic labels, and no real visual structure. It looked more like a temporary setup than something I actually cared about.
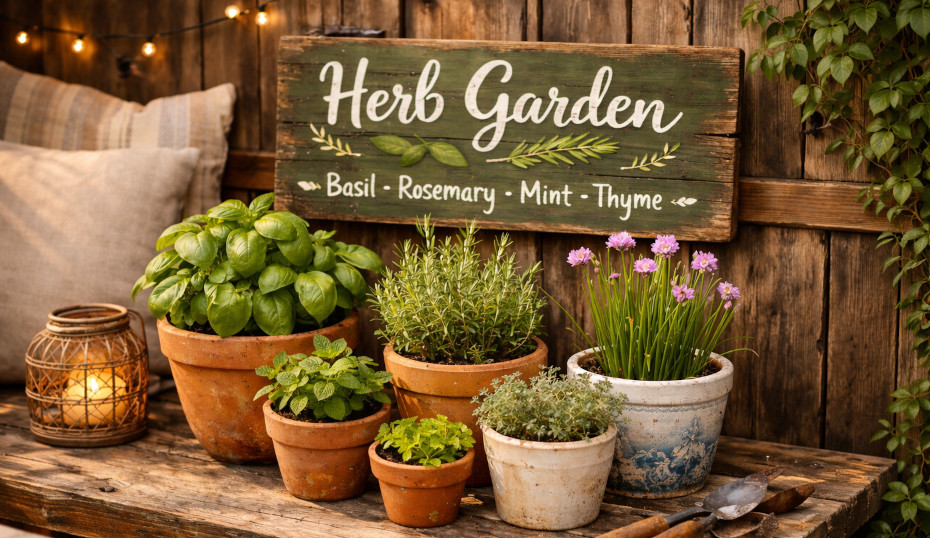
That changed when I made a DIY painted herb garden sign.
It took me a single afternoon, cost less than $20, and instantly pulled the whole space together. If you’re growing herbs on a windowsill, balcony, or patio, this is one of the easiest ways I’ve found to make the space feel intentional. If you enjoy small, creative projects like this, I’ve found that even simple additions can completely change how a space feels. I started with this sign and later experimented with other kitchen-themed DIYs, like making decorative refrigerator magnets that tied the whole space together.
Key Takeaways
- This DIY herb garden sign is beginner-friendly and requires no special tools
- Most projects cost between $10 and $25, depending on materials
- You can make one large sign or individual herb markers
- Outdoor sealant is essential for durability
- Wood choice affects both appearance and longevity
- The project takes about 2–3 hours, including drying time
Why a DIY Painted Herb Garden Sign Makes a Big Difference
Before I made mine, I kept mixing up the herbs. Thyme and oregano look almost identical when they’re young.
But the impact goes beyond labeling.
Adding a painted herb garden sign gave the space structure. It made everything feel deliberate instead of thrown together. It also changed how I interacted with the garden. Once it looked put together, I naturally started maintaining it better.
That was something I didn’t expect.
What You’ll Need
I kept everything simple and used materials I could easily find at a craft store.
For the Base
- Wooden board, pallet wood, fence plank, or craft panel
- Medium and fine-grit sandpaper
For Painting and Lettering
- Acrylic paint, chalk paint, or outdoor craft paint
- Small flat brush
- Fine-tip brush or paint pen
- Pencil for sketching
For Finishing
- Clear acrylic sealant or outdoor Mod Podge
- Twine, rope, or hanging hook
Optional
- Stencils
- Transfer paper
- Wood-burning tool
How to Choose the Best Wood for a DIY Herb Garden Sign
The wood you choose affects both the look and durability.
- Pallet wood: Rustic and full of character. My first sign used scrap pallet wood.
- Craft panels: The easiest option. Smooth, clean, and beginner-friendly
- Cedar boards: Great for outdoor use, especially in humid climates
- Wood slices: Ideal for individual herb garden markers
No matter what you choose, sanding is essential. A smooth surface makes painting much easier.

Step-by-Step: How I Made My Painted Herb Garden Sign
Step 1: Sand and Prep the Wood
I started with medium-grit sandpaper, then finished with fine-grit sandpaper. This removed splinters and smoothed the surface.
After sanding, I wiped everything down with a dry cloth.
Step 2: Paint the Background
I applied two thin coats of paint instead of one thick layer. This gave a smoother finish.
Popular color choices I’ve used or seen work well:
- White
- Sage green
- Terracotta
- Navy
For a slightly aged look, I lightly dry-brushed a second color over the base.
Step 3: Sketch the Design
This is where most people hesitate, but it’s easier than it looks.
I lightly sketched the text with a pencil first. This gave me room to adjust spacing before committing to paint.
Simple ideas that work well:
- A list of herbs
- “Fresh Herbs”
- Individual plant names
Step 4: Paint the Lettering
I used a paint pen for cleaner lines.
The key here is patience. Thin layers work better than trying to get it perfect in one pass.
If you’re not comfortable freehanding, stencils work just as well.
Step 5: Add Simple Details
I kept this minimal.
On mine, I added a small illustration of a watering can in the corner. Small details like this add personality without overwhelming the design.
Step 6: Seal the Sign
This is the step I learned the hard way.
The first time, I skipped proper sealing. After a couple of rainy weeks, the paint started fading.
Now I always apply at least two coats of clear sealant. It protects against moisture, sunlight, and general wear.
Step 7: Add a Hanging Method
I drilled two holes and added jute twine for a rustic look.
Other options:
- Picture hooks
- Mounted backing
- Stakes for turning it into herb garden markers
Growing Herbs in Atlanta
I’ve noticed that once people improve a small herb corner, it often leads to bigger upgrades. Better planters, improved layouts, and more intentional outdoor spaces tend to follow. In my case, that same momentum eventually led me to build a DIY outdoor kitchen appliance enclosure to protect my grill and mini fridge from Atlanta’s unpredictable weather.
Space is another factor. Many people here garden on patios or balconies rather than large backyards.
That’s exactly why small upgrades like a herb garden sign make such a difference. When space is limited, design matters more. A simple sign can make a small corner feel finished and intentional.
Common Mistakes to Avoid When Making a Herb Garden Sign
A few things stood out after making my first sign:
- Skipping sealant is a mistake. The weather will wear it down quickly
- Let each layer dry fully before moving on
- Simple designs always look better than overly detailed ones
- Good spacing matters more than fancy lettering
The biggest lesson was this: the cleaner and simpler the design, the better it holds up over time.
Herb Garden Sign Variations Worth Trying
Once I finished my first one, I ended up experimenting with a few variations:
- Individual herb markers: One small sign per plant
- Chalkboard style: Easy to update as your garden changes
- Burned wood signs: More permanent and textured
- Vertical sign with hooks: Useful for hanging tools or dried herbs
- Gift sets: Pair markers with herb seeds
Each version keeps the same basic process but changes the final look.
Frequently Asked Questions
What paint works best for an outdoor herb garden sign?
Outdoor acrylic or chalk paint works well, but the sealant is what really protects the sign.
Do I need special tools for lettering?
No. A paint pen, fine brush, or stencil is enough.
How long does a painted wood sign last outdoors?
With proper sealing, it typically lasts 2 to 5 years. Reapplying sealant yearly helps extend its life.
Can kids help with this project?
Yes. Kids can handle painting the background. Adults should handle detailed lettering.
What’s the easiest wood for beginners?
Pre-cut craft panels are the easiest to work with. They come smooth and ready to paint.
Final Thoughts on Making Your DIY Herb Garden Sign
This is one of those projects where the effort is small, but the impact is immediate.
Making a DIY painted herb garden sign completely changed how my herb space looked and felt. It turned something scattered into something intentional.
If you’re starting out with DIY or just want a quick upgrade for your kitchen or patio, this is an easy win.
Keep the design simple, seal it properly, and you’ll end up with something that looks good every time you step outside or reach for fresh herbs.